Hiking north of Kathmandu can feel like you blink and the city is gone. This 3-day Kathmandu Valley Rim Hike is built around easy-to-moderate days on foot, rural farm villages, and big mountain payoffs from Chisapani and Nagarkot. I especially like that you get both scenery and culture—forest walking plus village life outside the main tourist route. I also like that the trip wraps in practical logistics: private transport, included trekking meals, and a guide who can work in multiple languages. One possible drawback to consider: you’re still doing multi-hour walking days, and the start is early, so it’s not a good match if you want lots of lounging time.
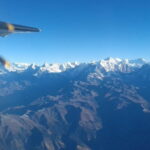
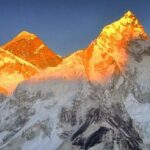
This route is also a nice “taste of Nepal trekking” without committing to higher-altitude, hardcore trails. You’ll spend two nights on the trek (not in Kathmandu), and you’ll be moving through jungle vegetation and wildlife habitat while working toward several famous viewpoint areas. If you’re chasing those clear, panoramic views of Langtang, Ganesh Himal, Gaurisankar, and even part of the Everest range, this hike is a very efficient way to chase them—just be ready for weather to play a role.
In This Review
- Key points at a glance
- A rim hike that trades city traffic for mountain time
- Day 1: Sundarijal to Chisapani for forest walking and peak panoramas
- Day 2: Chisapani onward to Nagarkot viewpoints
- Day 3: Down to Changunarayan temple and back to Kathmandu
- What makes the views here so good (and how to get the most from them)
- Price and what you actually get for $381
- Guide quality matters more than you think
- How hard is it, really? Fitness level and walking hours
- Practical logistics that make this easier on your trip
- Who should book this Kathmandu Valley Rim Hike
- Should you book this hike?
- FAQ
- Where does the trek start and what’s the first hiking area?
- What are the main towns and viewpoints on the route?
- How long is the Kathmandu Valley Rim Hike?
- What time does the experience start?
- Is pickup and drop-off included?
- Is accommodation included?
- Are meals included?
- Does the guide speak my language?
- What’s not included in the price?
- Can I get a refund if plans change?
Key points at a glance
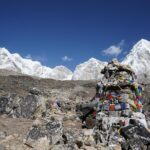
- Sundarijal to Chisapani: a first-day climb with a strong panoramic payoff from Chisapani hill
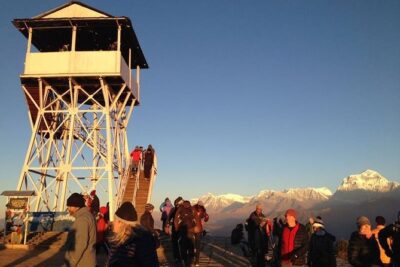
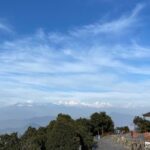
- Nagarkot View Tower: a classic viewpoint stop with dramatic morning potential
- Rural farm villages: quieter “outside-the-city” walking on trails that feel lived-in
- Forest plus mountain views: jungle-like sections with changing vegetation and fauna
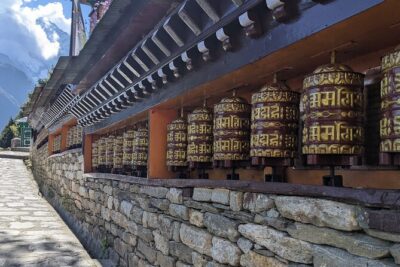
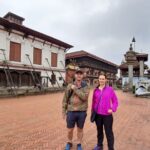
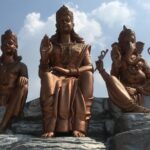
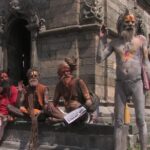
- Changunarayan temple finish: a meaningful cultural landing point before the drive back
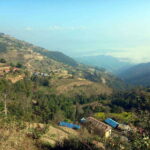
A rim hike that trades city traffic for mountain time
The Kathmandu Valley Rim Hike is designed for people who want the feel of trekking—walking, views, and fresh air—without needing technical gear or a long expedition schedule. You start by heading out of the Kathmandu area toward Sundarijal, then you work your way through forests and open viewpoints that look down toward the valley while framing the high Himalayan wall.
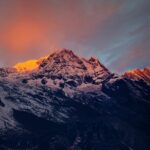
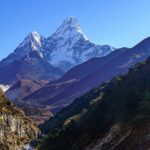
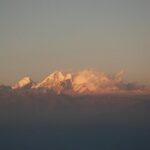
The “rim” idea matters because you’re not just hiking in one direction; you’re gaining elevation and sightlines. That’s why the named peaks are a selling point here. When you reach Chisapani hill, the views can include Dorje Lakpa, Langtang, Ganesh Himal, Gaurisankar, and part of the Mt. Everest range. It’s the kind of panorama that makes your brain do that quick math of distance and altitude.
You can also read our reviews of more hiking tours in Kathmandu
Day 1: Sundarijal to Chisapani for forest walking and peak panoramas
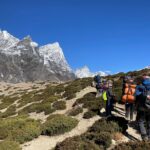
Your first trekking day begins at Sundarijal and heads toward Chisapani. The climb is described as an ascent of about 1,000 meters, which is a lot in the “short trek” category. Translation: expect steady effort and a good chance you’ll feel it in your legs even if you’re otherwise fit.
What makes this day special is the mix. You’re not walking across a single flat view corridor. Instead, you’ll move through jungle areas with different vegetation and flora and fauna, plus stretches that open up toward the mountain skyline. That balance is what keeps the day from feeling like a single long grind.
When you reach Chisapani, you get the most explicit “wow” moment. From the hill area, you can observe panoramic views that connect several major ranges: Langtang, Ganesh Himal, Gaurisankar, Dorje Lakpa, and part of the Everest range. It’s a classic Nepal “first big view” day—arrive, pause, breathe, and watch the peaks shift with light.
Practical consideration: since the highlight is tied to visibility, treat the first day as your window for clearer skies. If clouds roll in, you’ll still have a good trek through vegetation and village life, but the mountain drama depends on conditions.
Day 2: Chisapani onward to Nagarkot viewpoints
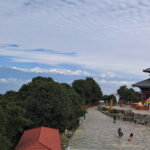
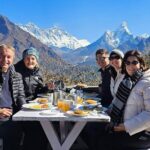
On day two, the hike continues from Chisapani toward Nagarkot, a well-known viewpoint town just outside the Kathmandu valley bowl. You’ll also experience another classic mountain-view stop: the Nagarkot View Tower. That tower is basically a built-in “pause point,” handy when you want photos without wandering around for the perfect angle.
This day keeps the same vibe: walking through changing terrain and then stepping into viewpoint areas where the valley and Himalaya meet in the distance. Nagarkot’s reputation exists for a reason, and even if you’re not treating this like a sunrise-only mission, it’s still one of the best places on the rim to look outward for long moments.
The itinerary also includes Dhulikhel as part of the broader route, and the focus is on striking morning-style views. Even if you don’t get a perfect weather window for sunrise, Nagarkot-Dhulikhel timing tends to reward early effort because the light is often better in the morning.
Downside to think about: day two can feel more “view-driven” than day one. If you like constant scenery variety, it’s still good, but the energy often shifts toward viewpoint stops where you’ll spend time standing still to look.
Day 3: Down to Changunarayan temple and back to Kathmandu
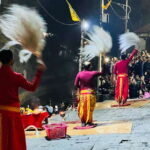
Your final day is the descent from the trekking area toward Changunarayan temple, followed by a drive back to Kathmandu. Finishing at a temple is a nice way to close the loop. After hours of walking through forest and villages, you end the trek with a cultural anchor that feels grounded and human-scaled.
The temple finish also changes the pace. You’re not just hopping from one viewpoint to another; you’re transitioning from “walk and look” to “walk and arrive.” That makes the day feel like an end, not another long climb.
Once you’ve reached the finish point, you’ll be back on the road with transport provided, returning to Kathmandu. The experience ends back at the meeting point you started from, so you’re not left trying to solve logistics when you’re tired.
What makes the views here so good (and how to get the most from them)
This hike earns its money by stacking several view opportunities on a short schedule. Chisapani hill is the big first panorama, and Nagarkot adds a second viewpoint layer with the View Tower as a built-in vantage point. Dhulikhel rounds out the experience with morning-style striking views mentioned as a highlight.
Here’s the practical trick: with named peaks like Langtang, Ganesh Himal, Gaurisankar, and parts of Everest, you should plan your mindset around “possible” and “beautiful.” The Himalaya can hide behind cloud cover, haze, or changing weather. When visibility is good, you’ll get the full effect. When it’s not, you’ll still get the trekking payoff—vegetation, rural life, and the sense of distance from the city.
Also, don’t underestimate the value of walking through the forest to reach these vantage points. You’re earning the views. That’s part of why the scenery feels rewarding rather than just scenic-on-demand.

Price and what you actually get for $381
At $381 for about 3 days, this isn’t a budget “DIY only” hike, but it also isn’t trying to be a luxury expedition. The value comes from what’s included and what’s handled for you.
Included items that reduce your workload:
- 2 night accommodation in trekking
- All food (breakfast, lunch, dinner) during the trek
- A guide (including language options like English, Chinese, Spanish, German, and others)
- Private transport (car/jeep/mini bus/Hiace/tour bus depending on group size)
- Pick up and drop to the airport
This is a big deal for independent travelers. You’re not coordinating meals, lodging, and transport pieces across Kathmandu on limited time. You also avoid the common headache of trying to match your schedule with a driver and a guide separately.
What’s not included (so you can budget cleanly):
- Food and hotel in Kathmandu
- Soft and hard drinks
- Personal expenses
- Nepal visa
- International airfare
- Tips for the guide and driver
- Anything outside the listed services
My take: if you factor in guide-led trekking support plus full trekking meals plus transport, the cost starts to make sense. If you already had a guide and your own transport lined up, it might feel less like a bargain. But for most visitors, the “everything runs smoothly” value is exactly what you’re buying.
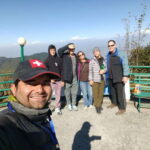
Guide quality matters more than you think
One of the standout details from the experience is the role the guide plays. In at least one case, the guide Riman was singled out for being kind and knowledgeable, and that kind of support changes the hike from just a route to a real understanding of what you’re seeing.
This matters because a short trek can still feel confusing if you don’t know what you’re walking through. A good guide helps you connect the dots: why the villages look the way they do, what those mountain names refer to, and what sections are worth slowing down for.
Also, the trip can run with a multi-lingual guide based on your language preference. That’s especially useful if you want to ask questions in a comfortable language rather than relying on gestures.
How hard is it, really? Fitness level and walking hours
The hike is described as suitable for any fitness level of people as long as you can walk for multiple hours each day. That wording is important. It’s not “easy,” but it also doesn’t demand intense athletic conditioning like high-altitude treks.
So what should you do to judge fit?
- Think in terms of daily walking stamina, not hiking experience.
- If you can handle long walks on uneven paths, you’ll likely be comfortable.
- If you get tired after shorter distances, plan on taking it slow and leaning on the guide to manage pacing.
Given that day one includes a climb of around 1,000 meters to Chisapani, most people feel that effort even if they’re not winded by the end.
Practical logistics that make this easier on your trip
A few details make this hike smoother than many “book a trek, figure it out later” experiences.
- Early start: the meeting start time is 7:15 am, so you’ll want to be ready for a morning schedule.
- Mobile ticket: you’ll receive a mobile ticket, which helps if you’re traveling with limited paperwork.
- Private tour: it’s private, so only your group participates. That usually means fewer awkward pacing issues and less waiting.
- Meeting point in Thamel: the start is at View Nepal Treks & Expedition in Kathmandu, near Thamel Marg, with a note that it’s near public transportation.
Also, transport is handled with a private vehicle choice depending on how many people are in your group. Translation: fewer public-transport surprises.
Who should book this Kathmandu Valley Rim Hike
This hike fits you if:
- You want mountain views without a multi-week commitment
- You enjoy forest and village walking, not just photo stops
- You’re visiting Kathmandu and want to see outside the main sights quickly
- You prefer a guided experience with language support
It may not be your best choice if:
- You want short, gentle walks every day
- You’re sensitive to early starts
- You’re only interested in guaranteed mountain visibility regardless of weather (no hike can promise that)
Should you book this hike?
Yes, consider booking this Kathmandu Valley Rim Hike if you want an efficient, guided way to experience the valley rim: rural villages, forest walking, and two major viewpoint zones (Chisapani and Nagarkot) with a temple finish at Changunarayan. It’s also a strong pick if you value included trekking meals and transport—those practical pieces make it feel like a real trip plan rather than a pile of logistics.
If you’re unsure about fitness, be honest about daily walking stamina. This is for people who can handle multi-hour days. If you can, you’ll likely love how much beauty and culture you pack into only a few days.
FAQ
Where does the trek start and what’s the first hiking area?
The trek starts from Sundarijal and then goes to Chisapani on the first day.
What are the main towns and viewpoints on the route?
Key stops include Chisapani, Nagarkot (including the Nagarkot View Tower), Dhulikhel, and the Changunarayan temple.
How long is the Kathmandu Valley Rim Hike?
It’s listed as 3 days (approximately).
What time does the experience start?
Start time is 7:15 am.
Is pickup and drop-off included?
Yes. Airport pick up and drop-off are included, and transport to and from the trekking route is provided.
Is accommodation included?
Yes. You get 2 night accommodation in trekking.
Are meals included?
Yes. All food during the trek is included: breakfast, lunch, and dinner.
Does the guide speak my language?
A guide is provided based on your language needs, with options like English, Chinese, Spanish, and German mentioned.
What’s not included in the price?
Food and hotel in Kathmandu, soft and hard drinks, personal expenses, Nepal visa, and international airfare are not included. Tips for the guide and driver are also not included.
Can I get a refund if plans change?
Free cancellation is available up to 24 hours in advance of the experience start time for a full refund.